I’ve had a few questions about Autopilots recently, so I thought I’d write a bit about what they do (and don’t do), how they’re used, and hopefully dispel a few myths along the way! I’ve included quite a bit of information here, so I hope I’ve not made it too complicated.
There seems to be a fundamental misunderstanding about the function and purpose of the Autopilot. Captain Sullenberger wrote an excellent article a while back which hit the nail on the head. If you’re the Pilot Flying, you don’t tune out whilst the Autopilot does all the work. The Pilot Flying is always flying the aeroplane. He or she may use the stick or the Autopilot to move the control surfaces of the aeroplane, but it is still the pilot flying the aeroplane, not the Autopilot. The Autopilot is not a “set and forget” type of device. It must be constantly monitored and parameters adjusted using the panel usually found in the centre of the coaming, referred to as the Flight Control Unit (FCU) on Airbus, or the Mode Control Panel (MCP) on Boeing. I’m much more familiar with the Airbus version, so I’ll talk about that here, but the Boeing version is very similar.
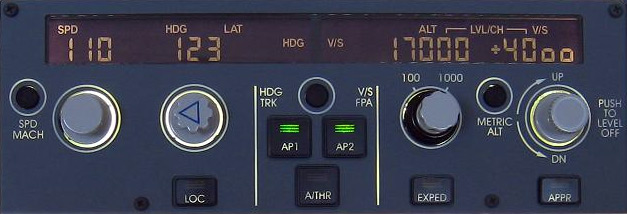
There are four knobs on the FCU. These correspond to Speed, Heading, Altitude, and Vertical Speed (V/S). On the Airbus, you can push these knobs to let the aircraft’s Flight Management and Guidance Computer (FMGC) control that channel, or pull them towards you to select them yourself. In the case of the Altitude knob, pulling will engage Open Climb or Open Descent depending on whether the selected altitude is above or below the aircraft altitude. If the Autothrust is engaged, Open Climb will select climb thrust, then the Autopilot will pitch the aircraft up to maintain the selected speed, so you achieve the best rate of climb available for the selected speed. Open Descent is similar, but will result in the Autothrust selecting idle thrust, then the Autopilot pitching the aircraft down to maintain the selected speed. You’ll probably be aware that aircraft operate most efficiently at minimum drag speed, which on the A320 is known as Green Dot and is usually around 200 knots. You’ll get a much better rate of climb at this speed than you will if you speed up to 250 knots after departure, so you can select the speed to use this to your advantage. The closer the aircraft speed is to Green Dot when climbing, the higher the rate of climb will be. Similarly, the closer the aircraft speed is to Green Dot when descending, the lower the rate of descent will be.
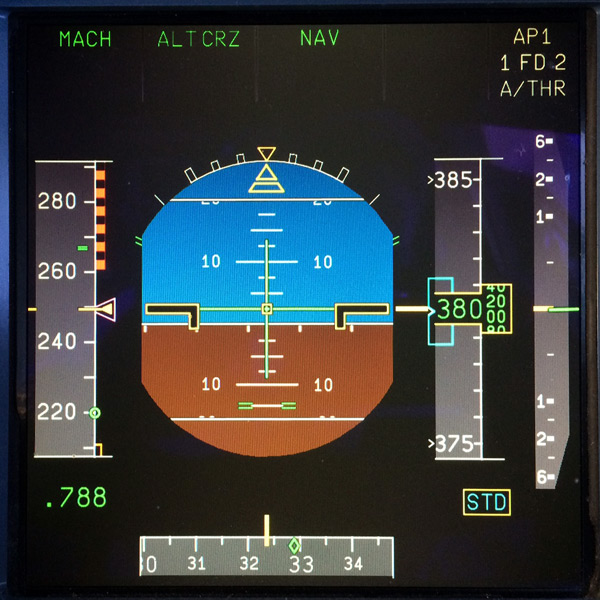
It all seems very straightforward, but using the Autopilot effectively and efficiently is a skill in itself. As an aside, although you interact with the FCU, this is just a request to the aircraft, You need to look at the Flight Mode Annunciators (FMAs) on the Primary Flight Display (PFD) to see what the aeroplane is actually doing. These are the green items at the top of the display. The columns correspond to Autothrust Mode, Vertical Mode and Lateral Mode respectively…
There are six distinct phases to a flight – the Take Off, Climb, Cruise, Descent, Approach, and Landing. Let’s look at how we might (or might not) use the Autopilot for each phase…
1. The Take Off
All take offs are performed manually. On the Airbus you can engage the Autopilot once the aircraft is 100 feet above the runway. In reality, most pilots fly the aircraft manually for a bit longer than that. Personally, I usually fly through Thrust Reduction and Acceleration Altitude manually, and then fly any interesting turns on the SID before engaging the Autopilot. If the departure is very complex it makes sense to engage the Autopilot earlier, as you then have spare capacity to manage the aircraft path and cope with anything out of the ordinary.
2. The Climb
So you’ve taken off and engaged the Autopilot. The aeroplane will navigate laterally around the SID you’re flying in NAV mode, but the skill here is in managing the vertical profile. You’re usually only permitted to initially climb to around 4000 to 6000 feet on the SID, so you need to manage the aircraft energy. ATC will usually give you climb in steps, so you can use V/S to try and maintain a continuous climb, which is more efficient on fuel and more comfortable for the passengers. This is more difficult than it sounds – pick a high V/S and you’ll find you need to level off before you get the next climb instruction. But pick a low V/S and you’ll find yourself lower than you should be, getting in the way of other traffic, and burning more fuel. Things are made easier with experience. For example, if departing to the North from Gatwick, whilst heading East ATC will sometimes give you a fairly large step climb. The faster you can climb, the sooner ATC will let you turn North because you’ll be high enough to avoid the Heathrow traffic, giving you a bit of a shortcut. By pulling the Speed knob and selecting a speed of around 220 knots then pulling the Altitude knob for Open Climb, you can climb as fast as possible. Again though, the skill is in managing the energy of the aircraft. You might not get the turn instruction from ATC when you want it, or you might not get further climb, so you can accelerate the aircraft or revert to V/S to keep things smooth. The same goes for the rest of the climb all the way up to cruise altitude. With experience you start to get a feel for where each ATC sector will allow you to climb to. The goal is to continue climbing from departure all the way up to the cruise.
3. The Cruise
This phase requires less interaction with the FCU. Nav is usually active, and the aircraft will fly laterally between the waypoints in the flight plan. There are times when the Heading knob will be pulled to set a heading, typically when ATC request it to separate traffic, or there is a weather buildup ahead which it would be best to avoid. Altitude changes will also be made from time to time, again when requested by ATC, when turbulence is encountered and the ride is smoother at another level, or on longer sectors, as fuel is burned and the aircraft gets lighter, it is able to cruise higher and therefore more efficiently.
4. The Descent
This is very similar in concept to the climb phase. Airliners are very efficient and take a long time to descend! To make a landing at Gatwick, the descent usually starts over France. You’ll usually be required to descend to a certain altitude by a certain waypoint. This is where some mental arithmetic is required! Some people like to use the three times table to achieve this – the aircraft will descend approximately 300ft per nautical mile covered, so losing 30,000ft takes around 90 miles. Others (myself included) do it slightly differently. In the top left corner of the Navigation Display (ND), the aircraft’s ground speed is displayed. This can be used to work out miles per minute. This, along with the distance to your target waypoint, can be used to work out what rate of descent you need in feet per minute, which you can select using V/S. The good thing about the second technique is it takes into account the aircraft’s speed and any headwind or tailwind component, which can make a huge difference to your ground speed. It’s more efficient to stay at altitude for longer then descend with idle thrust in Open Descent. If you’ve got a long way to go and not much altitude to lose, you can use V/S to control your rate of descent. If ATC have kept you high and you’re struggling to make the constraint they’ve set you have a couple of options. You can increase the aircraft’s speed – this means the aircraft is further from Green Dot and flying less efficiently, so will descend at an increased rate. Although your forward speed is faster, your overall profile will be steeper. Alternatively, you can use the Speed Brake, which lifts up Spoilers on each wing, creating drag and making them less efficient. The downside of this is that the whole aircraft will rumble from the turbulence created by the spoilers!
Again, it’s a question of managing the energy in the aircraft. You might get a shortcut and suddenly find yourself high, or get put on a radar heading which might increase you’re track miles, so you’ll find yourself low. You’re still trying to keep the descent constant so you receive the next descent instruction before levelling off. On top of this, you need to manage the energy in the aircraft’s speed. You don’t want to find yourself just about on the vertical profile but still at 300 knots, but you don’t want to slow down (or level off) early as that’s inefficient. Energy management is a tricky part of operating an airliner that you don’t really encounter until you start flying high performance aircraft. It takes a long time to get the hang of it, and you can only become proficient through experience.
5. The Approach
This phase involves configuring the aircraft for landing, whilst lining it up with the runway. The goal is to fly a Constant Descent Approach (CDA), where you don’t stop descending until you land. Levelling off requires the engines to spool up, burning more fuel and more importantly, creating noise for those on the ground. It’s the hardest phase to get right because it has the most variables. This is primarily because prior to intercepting the runway centreline, you will usually be given radar vectors by ATC. ATC do this to sequence multiple arriving traffic, and the complexity arises because you’re not always sure how long you’ll spend on vectors before joining final approach. This makes it difficult to plan your descent, but as with the other phases, in time you get a feel for what’s going to happen, and you can use cues like the TCAS display on the ND to see the location of other traffic and try and calculate your position in the arrivals. At the same time, you’re managing your speed – sometimes instructed by ATC, sometimes on your own, to ensure that you’re able to configure the aircraft and commence final approach with an energy level that will allow you to continue to a safe landing. There are many tricks you can use – ATC will usually slow you from 180 to 160 knots at about 10 miles from the runway, so you can use this knowledge to fly just below the glide path at 180 knots before raising the nose when instructed to slow down to allow the speed to reduce to 160 knots and the glide path to be intercepted. Selecting Flap 2 in the Airbus results in a little bunt which momentarily shallows the profile, so that’s often the point at which it’s selected.
You must have the aircraft in the landing configuration by 1000 feet above the runway at BA, which means if the energy isn’t under control by then and you’re too fast or too high, you’ll have to fly a go-around and make another approach.
The majority of approaches are flown with the Autopilot engaged, although if the weather is suitable, many pilots including myself often fly the approach manually once on radar vectors. This involves turning off the Autopilot and Flight Directors and flying the approach on raw data, just as you would do in a light aircraft. This not only keeps your handling skills sharp, it’s challenging and enjoyable too.
6. The Landing
Similar to take-offs, there’s a bit of a misunderstanding about Automatic Landings. Automatic Landings are very rare – they account for less than 1% of all landings and are usually only performed when the visibility is very low. In broad terms, visibility below CAT1 minima (550m) requires an Automatic Landing. 550m visibility might sound like a lot, but when you’re travelling at 75m a second, that gives you just over seven seconds between seeing an element of the runway lighting and touching down! Having landed manually in 550m visibility, the strangest thing was not being able to see the PAPIs at minima, and not being able to see enough of the runway to easily judge the vertical profile of the aircraft. Operating below these minima in Low Visibility Procedures (LVPs) for an Automatic Landing is an additional qualification which requires special training in the simulator. This capability also requires two Autopilots, in case one fails very late in the approach, which is why there is an AP1 and an AP2 button on the FCU. Only one Autopilot can be engaged at a time, except when making an approach to land.
As for Automatic Landings – the system is tuned to make safe landings. Safe means on the centreline, and in the touchdown zone. Safe is not the same as smooth! Pilots can see the environment outside the aircraft and finesse their landings accordingly – sometimes in blustery weather or on short runways the safest option is to set the aircraft down without delay. At other times the pilot can extend the flare slightly, of course still touching down in the touchdown zone, but trading a small amount of available runway for a softer touchdown. The automatic system can’t do that. Whilst we’re on the subject, a smooth landing and a safe landing aren’t necessarily the same either. It’s much safer to land the aeroplane firmly in the touchdown zone than float outside it trying to grease it on.
For a normal manual landing, if the approach has been flown with the Autopilot engaged and the pilot is visual with the runway, they will normally disconnect the Autopilot somewhere between 1000 and 500 feet above the runway. This provides the pilot with a chance to get a feel for the controls and the wind conditions before landing the aeroplane.
Hope this proves useful. As always, feel free to ask any questions!